Today was the day I’ve been looking forward to… Today I had round 1 of coolsculpting done on my fat pocket! I’ve been so excited about this day since I booked the appointment a month ago. Every time I looked in the mirror, instead of lamenting that nagging bulge, I would just laugh at it and think about what it would look like 3 months from then.
I said I would document the process, and I will take photos every week so that I can monitor how quickly it’s shrinking, but I wanted to get the official “before” photos and process photos posted in the spirit of transparency. So many people have asked what this involves and honestly, until today, I wasn’t sure what to expect myself. I knew it would be virtually painless and just a little bothersome, but to get hooked up to the machine and see it in action… well… that was something!
Here are my before photos. I actually took them after the procedure, but this truly is what the bulges look like and they are not swollen. Anyone who says that they’re not noticeable is a true friend – HA! Now you can see why I can’t wear a normal swimsuit without a skirt. The top two photos are my right side, the worst side. In the middle photo, you can see how much more dominant it is than the left bulge. The left one is much smoother, much more distributed than the right. The bottom photos show my left side – not near as offensive as the right.

Here is what they look like with clothes on. On the left, you see my left side which looks pretty normal – I’m happy with the left side in clothing. In the right photos, you can see the bulge and how it looks in jeans. This is why I have a hard time finding skinny jeans and can’t wear jeans that are made of a stretchy material.

Now…. here we go with the process!
I got to the office on time and the first thing she had me do was put on some disposable shorts so that every part of me was accessible when needed. Sexy! Then we took the clinical “before” photos and she had me rotate around a clock-like positioner so that she could get photos from every angle. These photos are used to compare my changes from day 0, day 30 (when they re-treat), and day 60. She then marked up my fat pockets with permanent marker so that she knew exactly where to hook up the suction wand to get the part that bothers me.
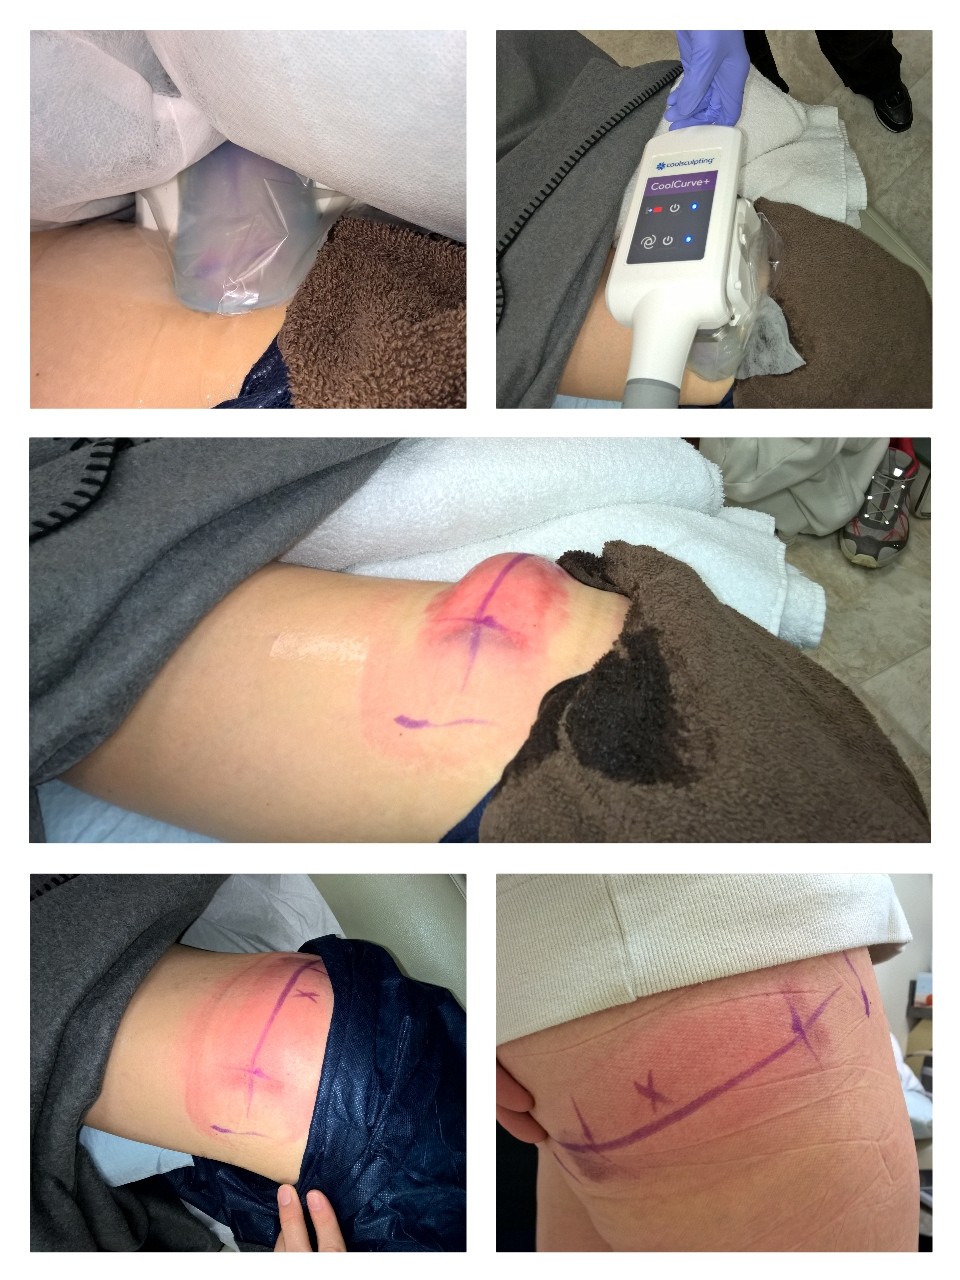
Then it was time to hook me up to the machine! She grabbed a freezing cold gel pad from the freezer and put it on my right fat pocket and then hooked the wand up. It was cold, but not terrible. The wand sucked my skin deep into the applicator and she showed me the line they want my skin to get to at a minimum for a good freeze, and she said that mine was well above that. She said, “you’re going to be happy with how this turns out!” She then propped pillows around my legs and put a boppy pillow around the wand to hold it stationary, and she stepped out. I watched “Mad Men” for an hour then she came back in and turned off the machine and took the wand off.
Holy hell – that was AMAZING! The bulge had frozen under my skin and it was sticking up in the shape of the applicator. She was very pleased, said that when it stands up like that, that it’s a “good freeze.” She had me feel it and said, “it feels like there’s a stick of butter under your skin.” That’s exactly what it felt like – I could even leave a finger imprint in it. It was pretty cool. I asked if all of that “butter” was fat cells that were frozen and she said, “pretty much, with just a little extra tissue in there.” It was neat to have a visual of what all is going to be flushed out of my system in a few weeks. The last step was for her to massage it back down, because the results are “35% better if we do that,” and then we switched to the other side and repeated the entire process.

Top left – the applicator with my skin and fat cells vacuumed into it; top right – the view of the wand/applicator from above my hip; middle photo – right after removing the wand, this is the “stick of butter” fat cells under the skin; bottom left – right after being massaged back down; bottom right – an hour later (no swelling, back to normal with the exception of some bruising)

Top left – just before removing the applicator on my left side (see that metal band on the applicator – they wanted my skin to go to that line or above but there wasn’t enough on my left side for that); right – right after removing the wand and peeling up the gel pad from my “stick of butter” fat cells (notice how much smaller it is than my right side); bottom left – post-massage and about 3-5 minutes after taking the wand off.
I have to say, the worst part of the experience was the chair/table I had to lay on for an hour on my side – my legs fell asleep and when I switched to do the left side, I had a lot of pain in my right leg. BUT – it was over again in an hour and as promised, there was no down time. I ran 5.0 miles just 3 hours after I walked out of there.
Amazing!
My re-treat is scheduled for May 24th and we will do the right side again (will probably get the same amount of fat cells that time as today) and my belly fat above my C-section scar. Stay tuned for photos in the next week or two to see if there’s a change yet!